



If your Philips smart lock requires an activation code, activate it before registering fingerprints, creating PIN codes, or configuring supported app features. The process is completed once: wake the keypad, enter the supplied activation sequence, and wait for the “Activation successful” confirmation.
Activation initializes the smart lock and prepares it for user setup.
If you are still identifying your lock or checking available models, browse OjiSmart’s Philips smart locks.
Important: Philips smart lock setup procedures vary by model. This guide applies to models supplied with an activation code. Always use the code and setup information provided with your specific Philips smart lock.
What You Need Before Activating Your Philips Smart Lock
Before starting, make sure:
- The batteries are installed correctly.
- The lock has sufficient battery power.
- You have the activation code supplied with the lock or setup card.
- The keypad responds when touched.
Once these are ready, you can begin the activation process.
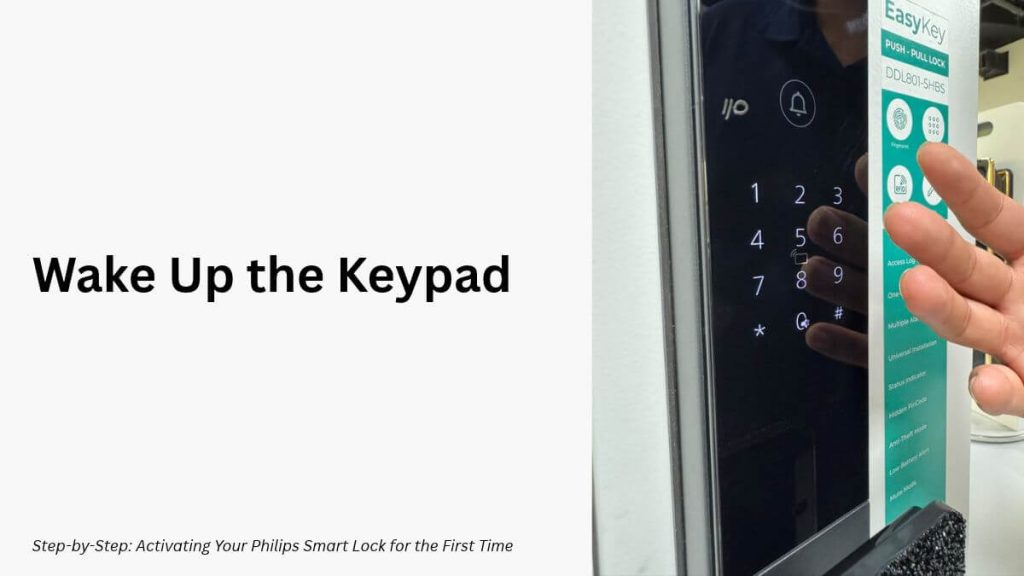
Step 1 — Wake Up the Keypad
Touch or tap the keypad to wake the Philips smart lock.
The keypad or display should illuminate, confirming that the lock is ready to receive input.
If the keypad does not respond: check that the batteries are correctly installed and have sufficient charge before continuing.
Step 2 — Enter the Activation Code
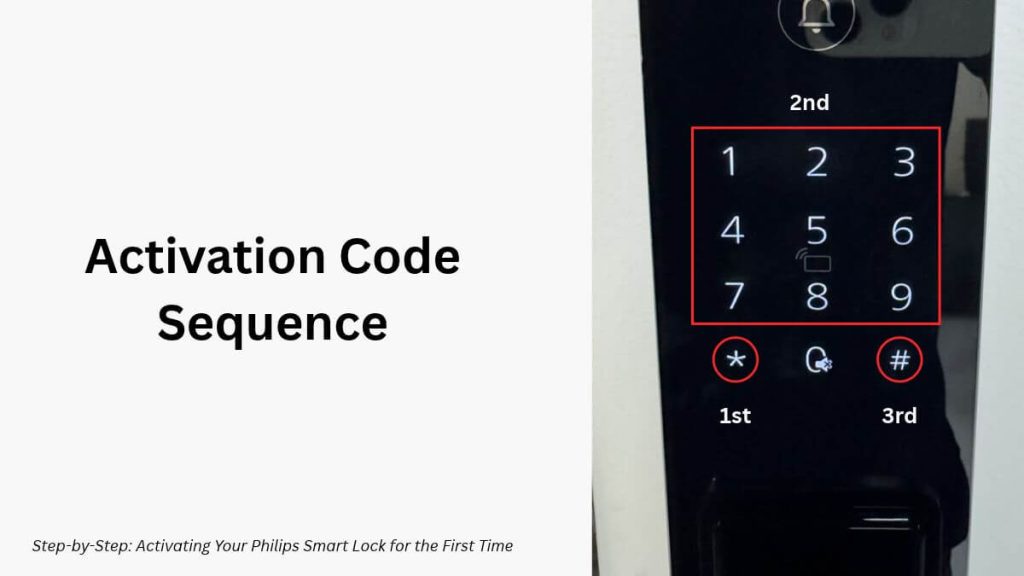
Enter the activation sequence in this order:
Star key → Activation Code → Hash key
In keypad symbols:
* → Activation Code → #
Follow these three steps:
- Press the * star key.
- Enter the activation code supplied with your lock.
- Press the # hash key to confirm.
Activation Code Example
If the example activation code were:
123456
You would enter:
* 123456 #
The number above is only an example.
Do not use 123456 unless it is the actual activation code supplied with your Philips smart lock.
* → Activation Code → #
Step 3 — Listen for the Activation Confirmation
Once the correct activation code has been accepted, the smart lock should provide the voice prompt:
“Activation successful.”
That confirms the Philips smart lock has been initialized successfully.
You can then continue with the setup functions supported by your particular model, which may include:
- Registering fingerprints
- Creating user PIN codes
- Adding key tags or access cards
- Setting administrator credentials
- Configuring security settings
- Connecting supported mobile app features
IMAGE PLACEMENT 3 — Optional image here
Recommended image: Philips smart lock ready for configuration after activation.
Philips Smart Lock Activation Not Working?
If you do not hear “Activation successful,” first check the activation sequence, the code itself, and the lock’s battery power.
Work through the following checks before changing any other settings.
Check the Activation Sequence
Make sure you entered the activation code in the correct order:
* → Activation Code → #
The star key starts the activation sequence, while the hash key confirms the code.
Re-enter the Activation Code Carefully
Check every digit against the activation code supplied with your Philips smart lock.
Enter the sequence again carefully and avoid unusually long pauses between key presses.
Check the Batteries
If the keypad is slow, turns off unexpectedly, or does not respond, check that the batteries:
- Are installed in the correct direction
- Have sufficient charge
- Are the correct battery type for your Philips smart lock
Confirm You Have the Correct Activation Code
Use the activation code supplied with your specific lock, packaging, setup card, or accompanying documentation.
Do not use an example activation code found online unless it matches the code supplied with your lock.
Still Unable to Activate Your Philips Smart Lock?
If the correct activation code and battery power have both been checked but activation still fails, contact OjiSmart support and provide the exact Philips smart lock model.
This helps the support team identify the correct setup procedure without guessing or unnecessarily resetting the lock.
What Should You Do After Activation?
Once activation is complete, the Philips smart lock is ready for the next stage of configuration.
Depending on the model, the setup sequence may include:
- Create or register the administrator credential.
- Register fingerprints.
- Create user PIN codes.
- Add key tags or cards where supported.
- Configure security and verification settings.
- Connect compatible app or network features.
Because Philips EasyKey models have different access technologies and connectivity options, always follow the setup procedure for your specific model.
Frequently Asked Questions
How do I activate a Philips smart lock?
For a Philips smart lock that requires activation, wake the keypad and enter:
* → Activation Code → #
Once the code is accepted, the lock should provide the voice confirmation “Activation successful.”
Do I need to activate my Philips smart lock before adding fingerprints?
Yes, if your Philips model requires activation. Complete the one-time activation process before registering fingerprints or other supported user credentials.
Where can I find my Philips smart lock activation code?
Use the activation code supplied with the smart lock, packaging, setup card, or accompanying product documentation.
What does “Activation successful” mean?
It means the Philips smart lock has accepted the activation code and completed its initial system activation.
Do I have to activate the Philips smart lock every time I use it?
No. Activation is a one-time initialization process.
After successful activation, you can proceed with normal setup and everyday use.
Why is my Philips smart lock activation code not working?
Check that:
- You are using the correct activation code.
- You pressed the star key before entering the code.
- You pressed the hash key afterward.
- The batteries have sufficient power.
- The keypad is responding correctly.
If activation continues to fail, contact OjiSmart support with the exact Philips model number.